

In this guide
The Quick Answer
A sports composite is a portrait of an athlete cut out from their original background and placed into a dramatic stadium, arena, or stylized backdrop. The result looks like the player was photographed at a professional venue with fog machines and stadium lighting, even though they were shot in a small studio or on a gym floor. It's the most in-demand product in youth sports photography right now, and once you learn the workflow, each composite takes about 10-15 minutes to produce.
This guide covers the full pro workflow: how to shoot subjects for compositing, the cutout and masking process, color matching to the backdrop, adding effects like fog and light flares, and how to build these into sellable products like memory mates and sports posters.

Why Sports Composites Are Worth Learning
The math is simple. A standard field portrait sells for $15-25 per print. A stadium composite sells for $30-80. The production cost difference is minimal because you're shooting in a studio (which is faster and cheaper than on-location) and the backdrop is a digital file you buy once and reuse forever. The perceived value is much higher because the result looks like something from a professional sports magazine.
Parents love them. Kids love them. Coaches order team sets. And because composites look dramatically different from what every other photographer at the league is offering (standard field shots), you stand out immediately. I've seen photographers build their entire youth sports business around composites because the word-of-mouth from one impressed parent fills the next season's booking calendar.
The skills transfer across sports. Once you can composite a baseball player onto a stadium backdrop, you can do the same for football, soccer, volleyball, basketball, hockey, lacrosse, and any other sport. The workflow is identical. Only the backdrops and props change.
Step 1: Shooting for Composites
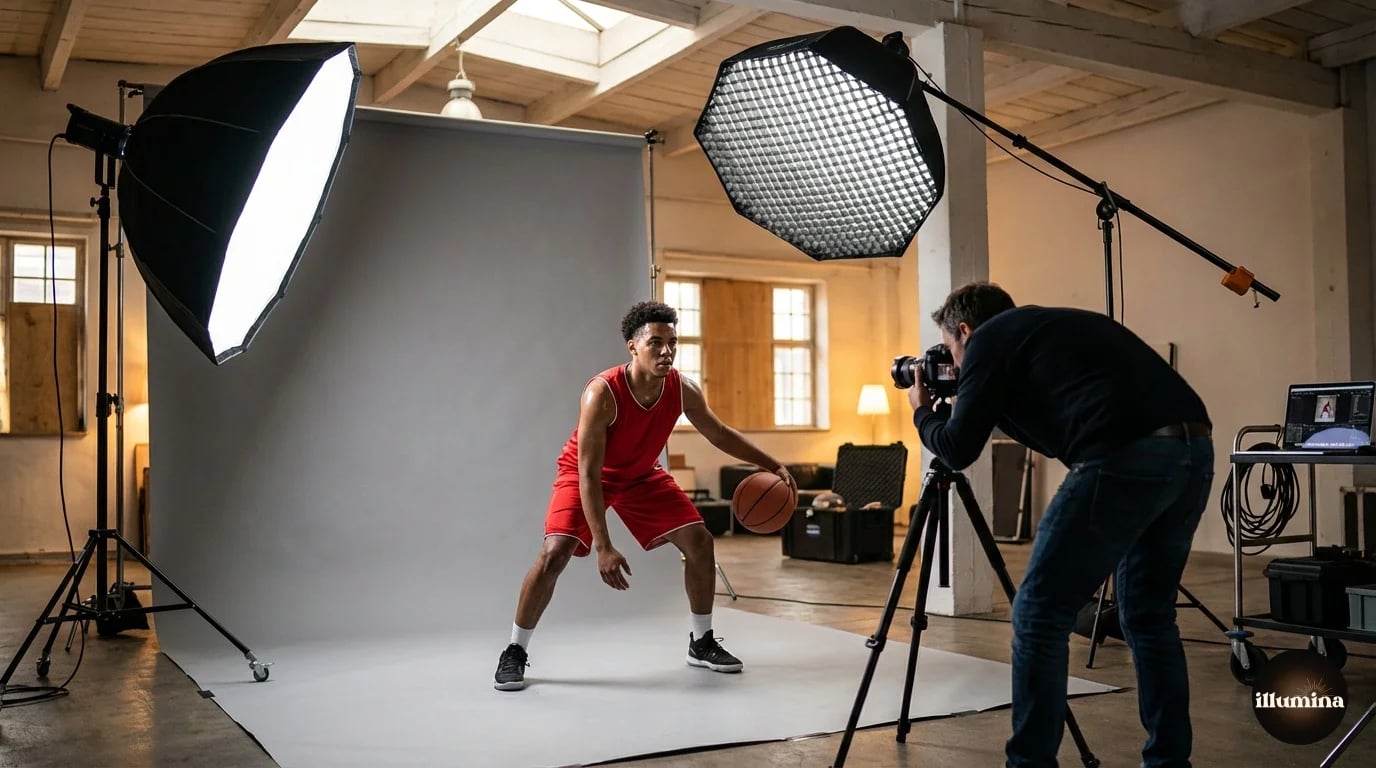
The shoot is the foundation. A bad source image can't be saved in post. Here's what matters.
Backdrop
Shoot against a plain backdrop: gray, white, or green. Gray is the most versatile because it doesn't cast color onto the subject's skin or uniform the way green can. If you're using a green screen, make sure the green doesn't reflect onto shiny surfaces (helmets, face masks, glossy jerseys). That reflected green is a nightmare to remove in post.
A 9-foot paper roll or a collapsible muslin backdrop is enough for individual athletes. For full-body shots with room to swing a bat or kick a ball, you need at least 8 feet of width and enough distance between the subject and the backdrop to prevent shadow spill.
Lighting
This is where most sports composites are won or lost. Your studio lighting needs to match the direction and quality of the light in the backdrop you're going to use. If the stadium backdrop has dramatic side light from the left, your key light should come from the left. If the backdrop has overhead arena lights, your key light should be high and slightly behind the subject.
A common setup: one key light at 45 degrees (camera left or right), one rim light behind the subject on the opposite side for edge separation, and one fill light or reflector at low power to open up the shadows. This three-light setup matches most stadium and arena backdrops because those venues have strong directional lighting with visible rim light from overhead fixtures.
Match the light direction to the backdrop before you shoot. Pick your backdrop first, study where the light sources are in the scene, then set up your studio lights to match. Mismatched light direction is the number one reason composites look fake.
Posing
Shoot the athlete in their full uniform with all equipment. Bat, glove, ball, helmet, pads. These details sell the illusion. Have them hold a natural athletic pose: batting stance, pitching wind-up, defensive crouch, goal celebration. Don't over-pose. The best composites look like a moment frozen in time, not a mannequin display.
Shoot full-body with extra space around the subject. You can always crop in, but you can't add body that was cut off at the frame edge. Leave at least a foot of backdrop visible on all sides. For action poses (mid-swing, jumping, kicking), use burst mode to catch the peak of the motion.
Step 2: The Cutout
Removing the background is the most time-consuming part of the workflow. For clean studio shots against a solid backdrop, Photoshop's Select Subject handles about 80% of the work. For the other 20% (hair sticking out from under helmets, loose jersey fabric, equipment with complex edges), you'll need Select and Mask with the Refine Edge brush.
The full cutout workflow is covered in our Photoshop background removal guide. For sports composites specifically, pay extra attention to:
Helmet edges. Face masks and cage bars create complex overlapping edges that Select Subject sometimes misses. Zoom to 100% and clean these up manually with a small brush on the layer mask.
Loose fabric. Jersey sleeves, shorts, and shoelaces that flutter or hang create wispy edges similar to hair. Use the Refine Edge brush on these areas rather than trying to manually paint the mask.
Equipment boundaries. Where the bat meets the hands, where the glove meets the arm, where the ball sits in the fingers. These junctions need to be clean because any visible masking error here looks obviously wrong.
Step 3: Placing on the Backdrop
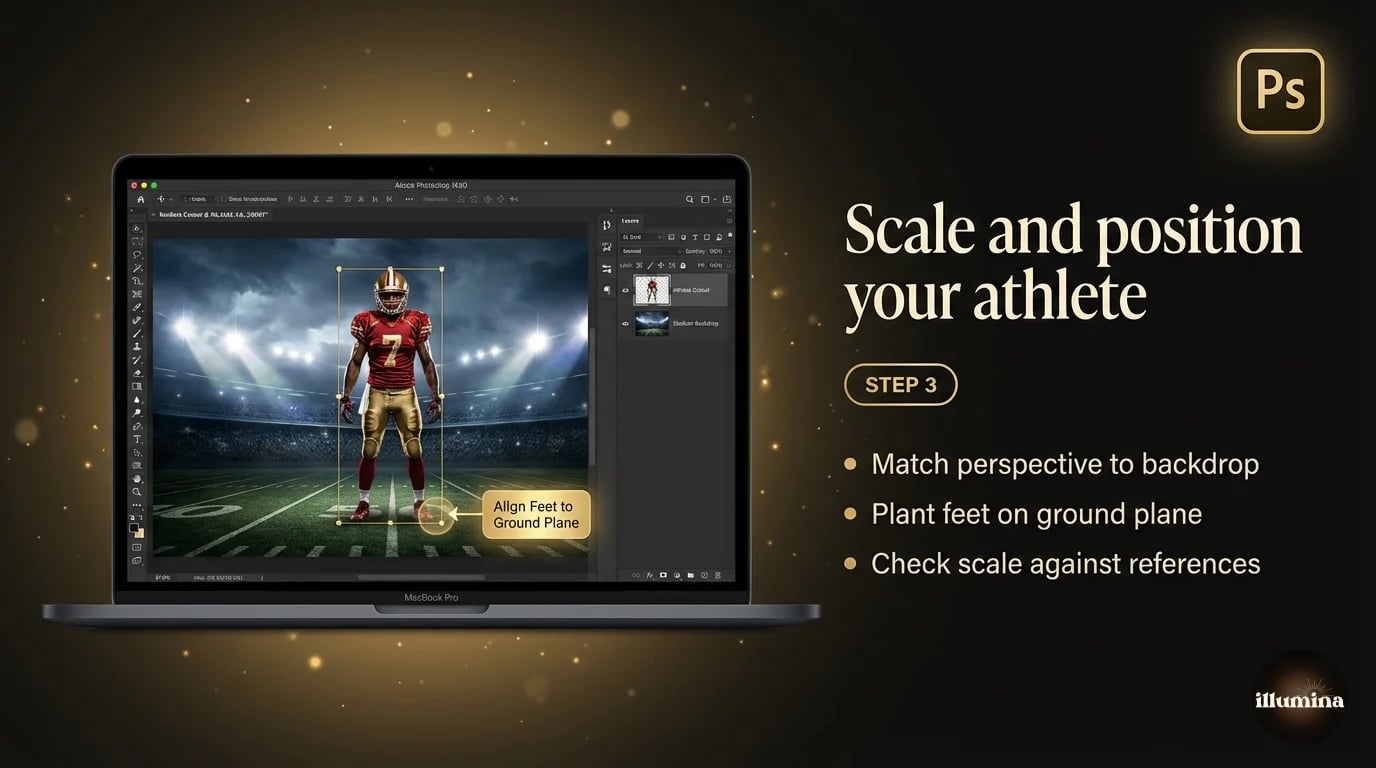
Open your backdrop file and drag the masked athlete layer in. Use Free Transform (Cmd+T) to scale and position.
Scale is critical. The athlete needs to be the right size relative to the environment. If the backdrop shows a stadium from midfield, the player should be roughly the size they'd appear from that distance. If the backdrop is a close-up tunnel or archway, the player fills more of the frame. Study the perspective lines in the backdrop and match the player's size and foot placement to the ground plane.
Foot placement grounds the athlete in the scene. Their feet (or base) should sit on a natural surface in the backdrop: the field, the court, the floor of the tunnel. If they're hovering an inch above the ground, the whole composite falls apart. Nudge the position until the feet feel planted.
Transform Your Photos
Give Your Photos the Wow Factor
Browse our collection of premium digital photo backdrops. 50 high-resolution print-ready backgrounds in each pack. Instant download.
Browse Backdrops


Step 4: Color Matching
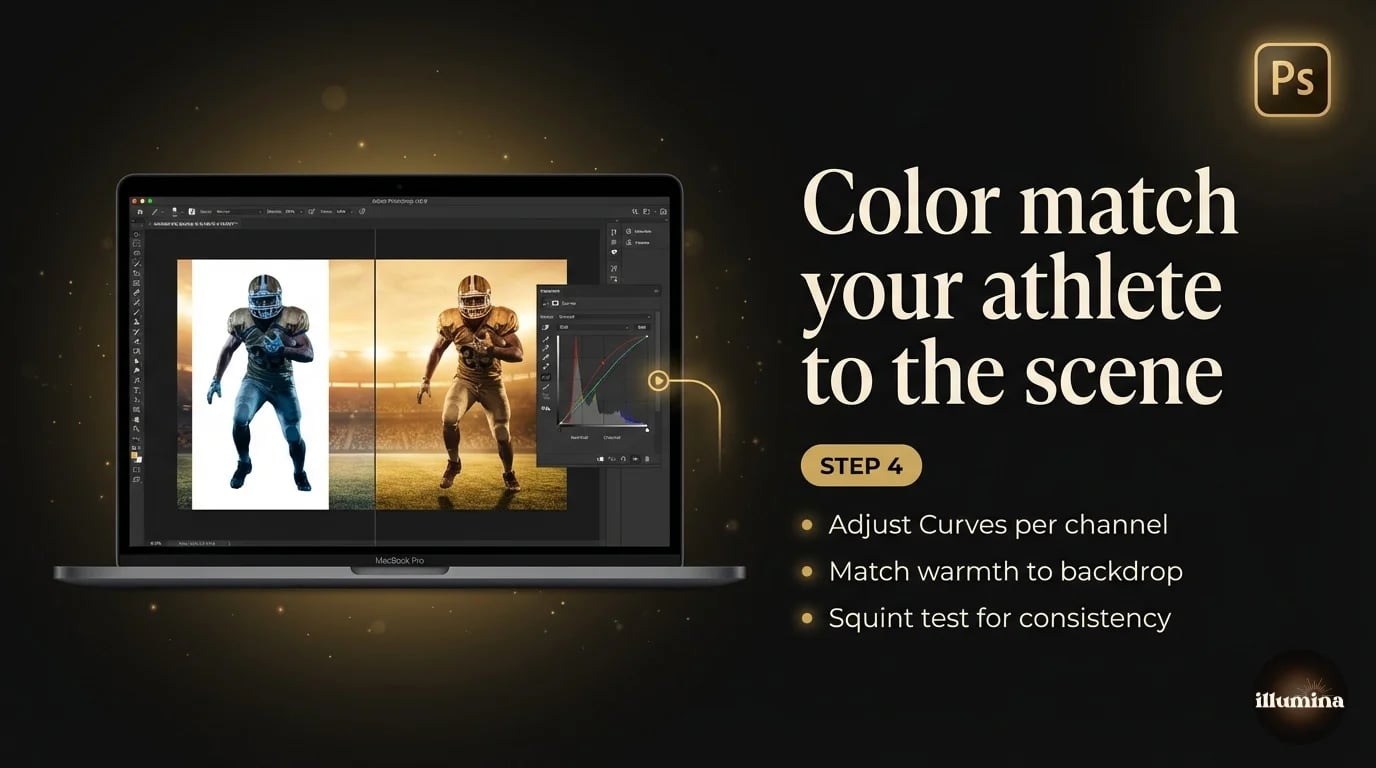
Your studio light and the backdrop's light won't be the same color temperature. The athlete will look "pasted on" until you match them.
Add a Curves adjustment layer clipped to the athlete layer (hold Alt and click between the layers). In the Curves dialog, adjust the individual Red, Green, and Blue channels to shift the athlete's color temperature. If the backdrop is warm (golden stadium lights), add warmth to the athlete by pulling the Blue curve down slightly and the Red curve up. If the backdrop is cool (arena fluorescents), do the opposite.
Then adjust the overall brightness. If the backdrop is a dark, moody stadium at night, the athlete should be darker too. If it's a bright outdoor field, lighten them. The Curves master channel (RGB) handles this. Pull it down to darken, up to brighten.
A quick sanity check: squint at the composite. When you squint, you lose detail and see only color and value relationships. If the athlete and backdrop feel like they belong in the same scene when you're squinting, the color match is close enough.
Squint at your composite. If the athlete looks like they're in a different photo when you squint, the color temperature or brightness is off. Fix it with Curves before moving on.
Step 5: Adding Shadows and Grounding
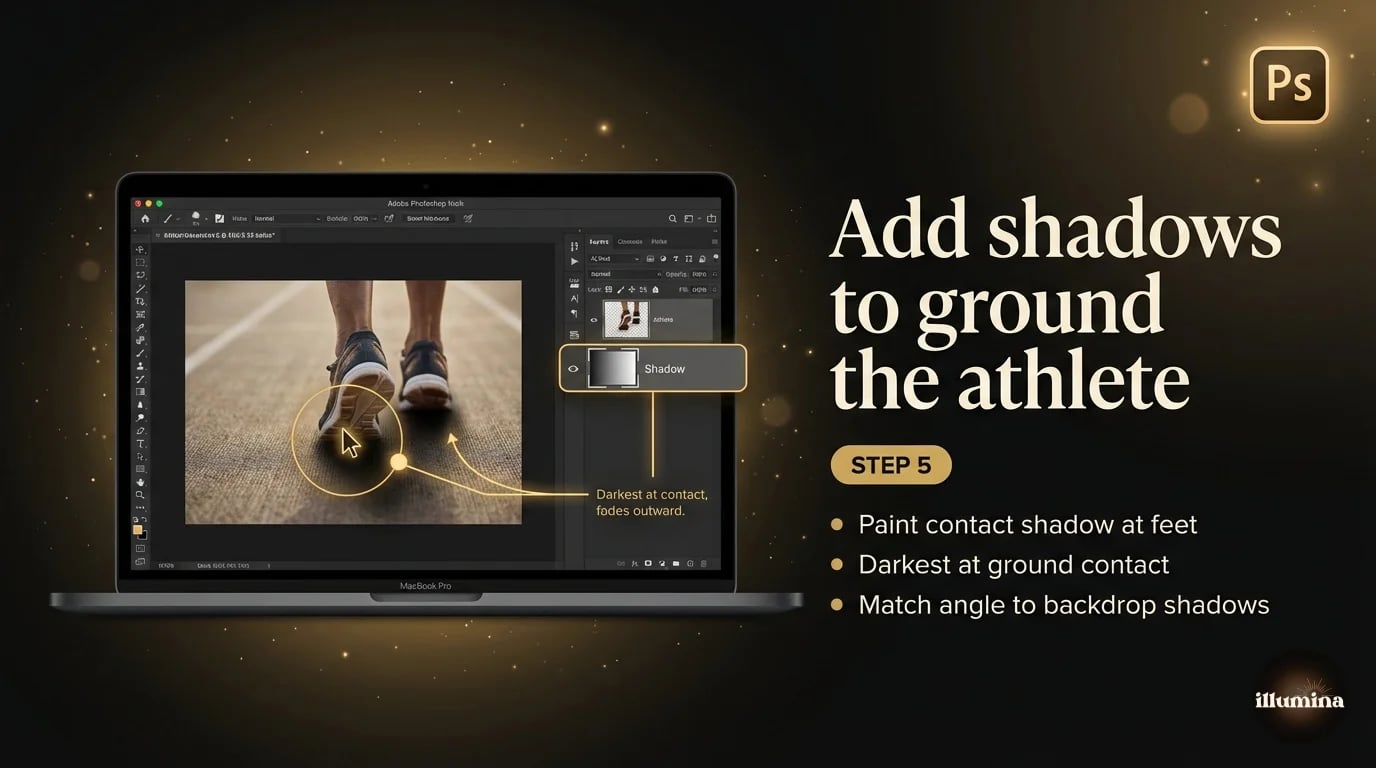
Without a shadow, the athlete floats. With the wrong shadow, they look pasted on a different surface. The right shadow is the single biggest contributor to a convincing composite after color matching.
Create a new layer below the athlete. Select a large, soft black brush at about 10-15% opacity. Paint a soft shadow directly beneath and slightly behind the feet. Build it up with multiple strokes rather than one heavy pass. The shadow should be darkest directly at the contact point (where the feet touch the ground) and fade out as it extends away.
For stadium composites with strong overhead lighting, the shadow should be relatively small and concentrated directly under the player. For outdoor composites with angled sunlight, the shadow extends further in the opposite direction from the light source.
If the backdrop has existing shadows (from goalposts, fences, other players), match the angle and density of your athlete's shadow to those reference shadows. Inconsistent shadow angles are the second most common giveaway of a bad composite, right after mismatched lighting direction.
Step 6: Adding Effects
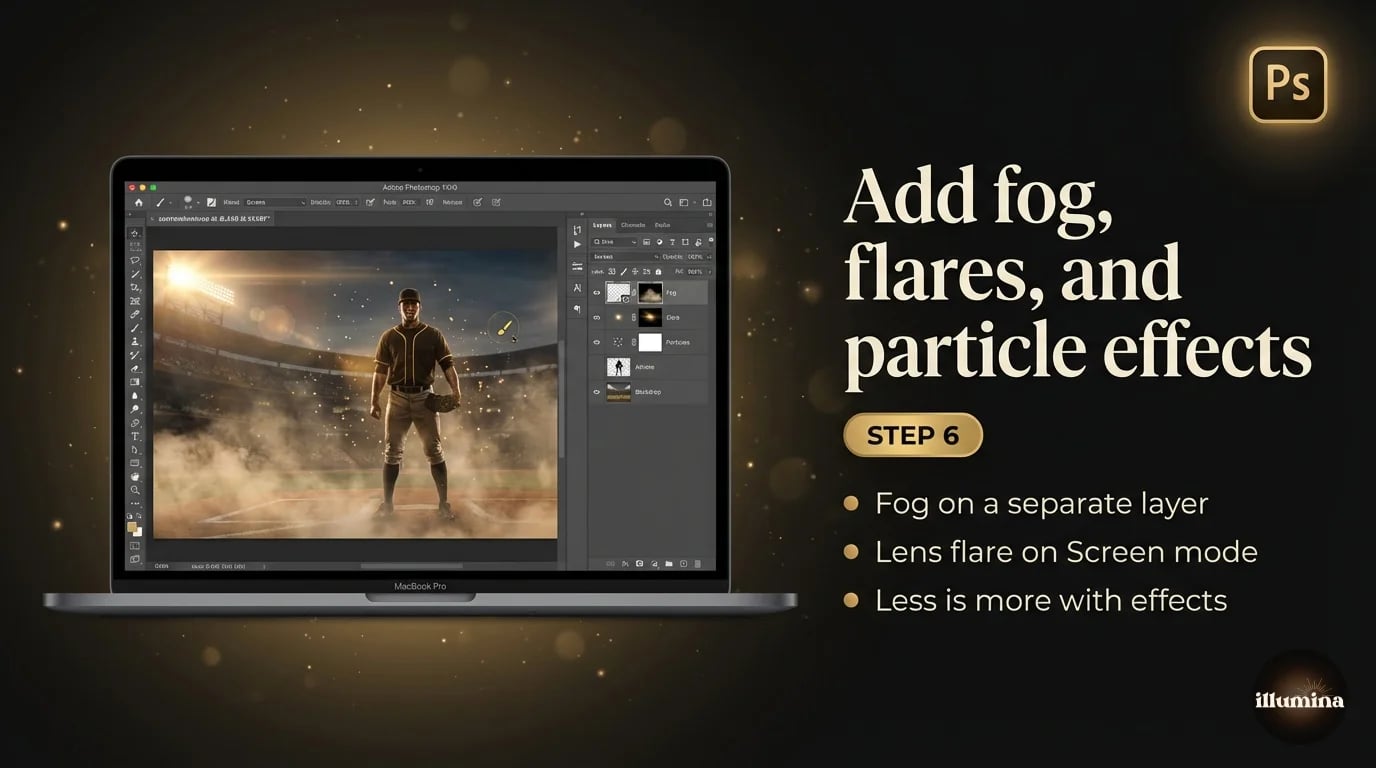
This is the fun part and the difference between a basic composite and one that makes parents gasp.
Fog and haze. Create a new layer above the backdrop but below the athlete. Use a large, very soft white brush at 5-10% opacity to paint wisps of fog around the athlete's lower body and feet. This mimics the fog machine look common in professional sports photography. Don't overdo it. A little fog adds atmosphere. A lot of fog looks like a haunted house.
Light flares and rays. Lens flare effects, when used subtly, can simulate stadium lighting hitting the camera. Download a free lens flare overlay (they're everywhere online), place it on a layer set to Screen blend mode, position it where a stadium light would be, and reduce opacity until it looks natural. Screen blend mode makes the black parts of the overlay disappear, leaving only the bright flare.
Sparks and particles. For dramatic sports posters, particle effects (sparks, embers, dust, rain) can add energy. Same technique: overlay image on a Screen or Add blend mode layer, position, adjust opacity. These work best when they're barely noticeable. If you can identify individual sparks, it's too much.
Color grading. A final Color Lookup Table (LUT) or gradient map applied to the entire composite can unify the look and give it a cinematic feel. Teal and orange is the classic sports photography grade (warm skin tones against cool shadows). Apply it at low opacity (10-20%) so it's a subtle shift, not a filter.
Common Composite Mistakes
Mismatched lighting direction. I keep repeating this because it's the most common mistake and the most visible one. If the stadium lights in the backdrop are coming from the upper right and your studio key light was on the left, the composite will never look right no matter how good your color matching is. Pick the backdrop before you shoot and match the light.
Over-processing. Composites can look incredible or they can look like a bad video game screenshot. The line between the two is subtlety. Fog should be barely visible. Flares should feel like an accident of the lens, not a Photoshop filter. Sparks should be faint. If someone looks at the image and notices the effects before they notice the athlete, you've gone too far.
Wrong scale. An athlete who appears 8 feet tall in a stadium, or 4 feet tall in a tunnel, immediately breaks the illusion. Use reference objects in the backdrop (doorways, railings, bleacher seats) to calibrate scale. A person should be roughly the right height relative to those objects.
Flat composites with no shadow. Without a shadow, the athlete looks like a sticker placed on top of a poster. Even a subtle contact shadow at the feet transforms the composite from "pasted" to "present." It takes thirty seconds to paint. Don't skip it.
Ignoring the background edge of the athlete. The edge where the cutout meets the backdrop is where composites succeed or fail on close inspection. A white fringe from the original gray backdrop, a chunky mask edge on a jersey sleeve, a missing fingertip on the throwing hand. Check every edge at 100% zoom before you export. The five minutes you spend on edge cleanup is the difference between a composite that holds up on a 16x20 print and one that falls apart.
Step 7: Export and Products

A finished composite can become multiple products:
Individual portrait print (8x10, 11x14, 16x20). The composite on its own, printed and matted. Sells for $25-50 depending on size.
Memory mate. The classic two-panel print with the individual composite on one side and the team photo on the other. Sells for $20-35. Every parent buys at least one. Templates for memory mates are available for Photoshop and Canva.
Sports poster. A large format print (16x20 or bigger) with the athlete's name, number, team name, and season year incorporated into the design alongside the composite. These are the premium product. Sells for $40-80. They end up framed on bedroom walls and stay there for years.
Digital package. The composite as a high-res JPEG plus social-media-sized versions (1080x1080, 1080x1350, 9x16 story). Parents post these immediately and the social sharing generates referrals. Include a small watermark or logo on the social versions.
Offer the digital package alongside prints, not instead of. Parents will buy the print for the wall AND pay for the digital version to post online. The digital file costs you nothing to deliver and adds $10-15 per order.
Building a Repeatable Workflow
The first composite takes an hour. By your tenth, you're down to 15 minutes. By your fiftieth, it's muscle memory. The key to speed is templating.
Build a Photoshop template for each product type (poster, memory mate, individual print). Include placeholder layers for the athlete, the backdrop, the shadow, the effects, and any text (name, number, team). Save these as PSD files. When you process a new athlete, open the template, drag in the new cutout, swap the backdrop if needed, adjust color matching, update the text, and export. Batch processing becomes realistic once you have templates dialed in.
If you're shooting an entire team (12-20 players), the workflow for a full roster of composites takes about 3-4 hours from start to finish: 30 minutes to shoot everyone in the studio, 2-3 hours to process the composites. At $40-60 per composite, that's $480-1,200 for an afternoon's work. The economics are why sports composite photography has exploded in the last five years.
For the full background removal workflow that feeds into this process, see our Photoshop background removal guide. For a simpler approach using Canva instead of Photoshop, our Canva compositing guide covers the basics.
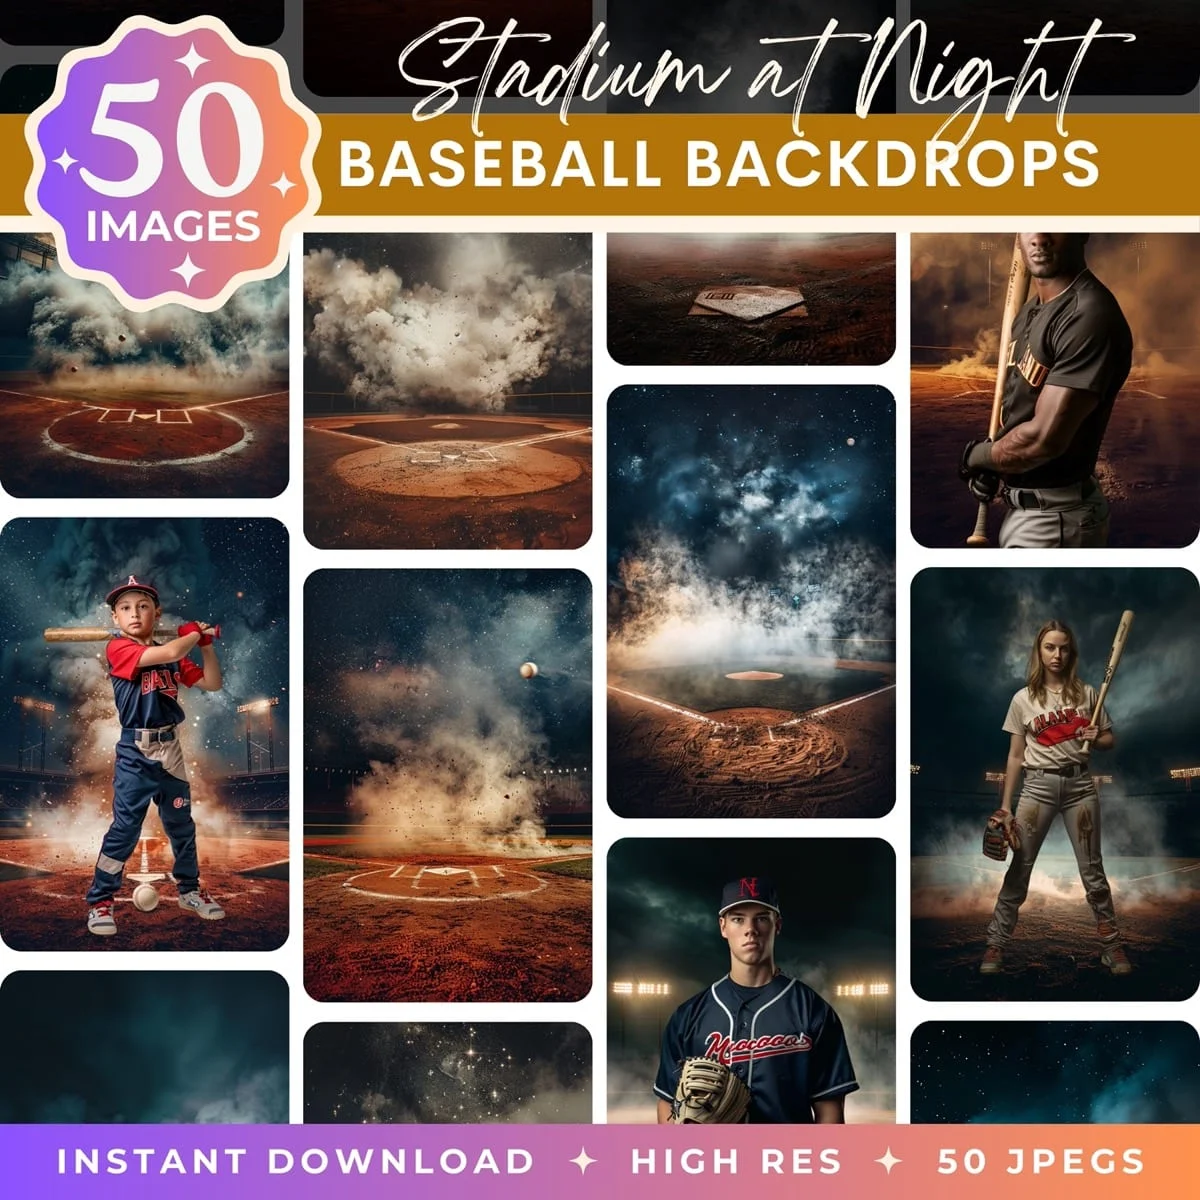
Stadium and arena scenes for sports compositing

Sports composites are the highest-margin product in youth sports photography. The workflow is learnable in a weekend, the tools are accessible, and the demand from parents and coaches is strong. Start with one sport, one backdrop, one template. Once that's dialed in, expand to other sports. The skills are identical. Only the jersey changes.
If you're just getting started, don't try to build the entire workflow at once. Shoot one athlete against gray, composite them onto one backdrop, make one poster. See the whole process end to end before you optimize. The first one will take longer than expected and the result will be rougher than you'd like. That's normal. By the third or fourth composite, the process clicks and the quality jumps. By the tenth, you'll wonder why you didn't start sooner.
Transform Your Photos
Give Your Photos the Wow Factor
Browse our collection of premium digital photo backdrops. 50 high-resolution print-ready backgrounds in each pack. Instant download.
Browse Backdrops

